
If you’ve got a Kitchenaid mixer, you know how great it is for mixing cookies (and the world’s best cheesecake), but did you know you can also use your Kitchenaid mixer attachments to grind your own meat (so you know exactly what’s in it), make sausage, or shred veggies?
And, the vegetable strainer/grinder is perfect for making your own applesauce or jam.
The best part? You don’t need to rush out and buy more appliances. All you have to do is add attachments to the Kitchenaid mixer you already have.
The beaters on a Kitchenaid use “planetary motion.” That means they move around the bowl, while at the same time spinning in the reverse direction on their own axis (sort of like the earth spins and moves around the sun).
The result looks a bit like a spirograph design. The good part is that this funny motion means it mixes faster and better than other mixers so you’ll need less time to prepare your recipes.
Using the Kitchenaid Mixer’s Speed Control
- Stir – use this when you first start mixing, to add dry ingredients to wet ones, and vice versa.
- 2 – for slow mixing, to start mashing potatoes, and knead dough.
- 4 – just the thing for making cookies, creaming sugar, and making meringues. You want to beat the ingredients, and combine them, without overmixing (or your batter will be the wrong texture). Use this speed with the grinder, slicer and strainer attachments.
- 6 – beating and creaming – set your mixer on this speed for final mixing and to use the citrus juicer.
- 8 – fast beating – for whipped cream
- 10- super-fast whipping – at this speed, it goes around so fast you can hardly see it. Only use small amounts of cream or egg whites – or it will all go flying. Set on this speed for pasta and grinding grain.
You can also set the mixer in-between the set speeds, for finer control.
How to Use Your Kitchenaid Mixer Attachments
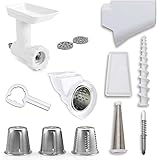
If you want to save space (and a bit of money), get this all in one pack. It has a grinder, strainer, and a slicer. Use it to grind meat, make salsa, shred cabbage for coleslaw, cut up veggies for a party platter, or make baby food. And, it all takes up a lot less space than a food processor, a meat grinder, and a mandoline would.
Grind your own meat (no additives or fillers), shred cheese, or cut carrots in waffle-shapes, or make your own perfect coleslaw.
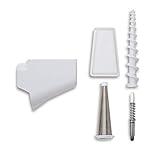
This set comes with the meat grinder (which has two settings, coarse and fine), a slicer/shredder, and a fruit and vegetable strainer.
Get a deal on meat, take it home, and use the grinder attachment to make your own burgers, and freeze them for later use. The slicer and shredder make short work of cheese, carrots, and potatoes. Use the strainer for applesauce, pasta sauce, or your own salsa.
How to Use Your Kitchenaid Mixer Grinder Attachment

Kitchenaid Food Grinder Attachment
This is great for grinding your own bread crumbs, grated hard cheese, or meat. Grinding your own meat is cheaper than buying it pre-ground. Plus, you know exactly what’s in it, and where it came from. You can see it in action on the image at the top of this page.
I use it to grind my own turkey and beef for meatballs, “unstuffed cabbage,” and burgers. It includes two grinding plates, one fine and one coarse. Both store right inside the grinder, so you won’t lose them.
Some reviewers said they found grease on the grinder when they bought it. I looked, saw a bit of it, and thoroughly cleaned it off. No problem, and nothing weird in the food.
Recipes Using the Kitchenaid Grinder Attachment
- Emeril Lagasse Burgers – Bacon, cheese, fresh thyme, and your own ground meat. Yum!
- Double double in-and-out burger – Recreate in-and-out’s burgers right in your own kitchen.
- Turkey sausage patties – The secret surprise in this recipe? Pear!
- Unstuffed Cabbage -Why bother making rolls when you can just layer it like lasagna instead?
How to Make Sausage with Your Kitchenaid Grinder Attachment
Sausage Making Part 1
Sausage Making Part 2
Sausage Recipes and Tips for Your Kitchenaid
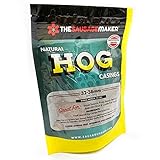
If you’re going to make sausage, you need casings to put them in. Make sure to soak them and then rinse them before using (so you know they’re clean). It also helps stretch them out and reduces tearing. Don’t worry if you don’t use them up all at once, as they’ll last for years in the fridge.
Attachment for Cookies and Cheesecake

No special equipment needed; use the beater that came with your mixer.
Making Cookies with the Kitchenaid
This woman cracks me up.
Kitchenaid Cookie Recipes
- Ruth’s Oatmeal Crisps – Scroll down to find the recipe. Note, I used butter, not shortening. It’s even better with dried cranberries instead of raisins.
- Chocolate chip cookies – Quick and easy chocolate chip recipe, with mixer speed instructions.
- Sugar cookies – Made with a dash of nutmeg for sweet/spiciness.
- Kitchenaid Peanut Butter cookies – Scroll down to see this recipe (direct from Kitchenaid’s facebook page)
- Italian sausage Make your own sausage, flavored with marjoram, thyme, and red wine.
- Sausage FAQ Tips on fat content, getting the right casings, and safety
- Sausage making tips How many sausages per pound of meat, sanitation tips, and more
- German sausage recipe A modern version of an early 16th century recipe
- Andouille sausage A recipe from Emeril Lagasse
- Homemade lamb, italian, and bratwust sausage Delicious recipes, plus plenty of sausage making tips (hint: buy extra fat!).
Fat is Essential for Sausages
If you don’t have enough fat, the sausages will taste like sawdust (yuck). 15 to 25% is best. Buy extra if necessary
I don’t normally quote reviews, but this one is irresistible. A customer says, “…[T]he sausages were incredible. I practically ate the first batch of Italian sausage all of 3.5 lbs by myself.
I had the hardest time sharing it with my kids who stared at me drooling with those puppy eyes begging to have a taste of what Mama was eating. And when I have to use these sausages for a pasta dish for some visiting friends, I actually regretted inviting them over since I wanted to eat the sausages myself. That bad..and that good!!”
The book is well-written, with recipes that are easy to follow (and tweak – I love tweaking). Recipes include bratwurst, cajun andouille, sausage with apples. There are American recipes with international influences (Asian, German, and Spanish) and then recipes that include sausage (for breakfast, in soups, and in pasta.
- Now that you’ve got all those cool new Kitchenaid attachments (or even before), you’ll want to know how to use them. This book is packed with recipes for everything from appetizers to sausages, to desserts.
How to Use Your Kitchenaid Strainer Attachment
Use this to easily make your own applesauce, tomato juice, homemade jam, grind cheese and make salsa.
If you want to make applesauce, just cut the applesfo in quarters, cook them, and run them through the strainer. The waste comes out separately, so no coring or peeling is necessary. You can do this with tomatoes for tomato sauce or juice too (those need to be peeled). This set comes with both the strainer and the grinder.
How to Assemble Your Kitchenaid Fruit and Vegetable Strainer
Kitchenaid Strainer Attachment Recipes
- Sweet Potatoes and Shrimp – Shrimp, sweet potatoes, and bacon
- Raspberry applesauce – I never thought of this, but I am definitely going to try it once raspberries are in season.
- Red pepper relish – This sweet and spicy recipe uses both the strainer and the grinder.
How to Use Your Kitchenaid Slicer/Shredder Attachment


- This attachment includes four different slicer/shredder “cones”: you can make thin or thick slices of cheese or cold cuts, shred cabbage, onions, or hard cheeses (like Parmesan). Use it for cucumber slaw, cole slaw, potato chips, chocolate, or nuts. There is a bit of a trick to putting it together (see the video below).
Assembling the Kitchenaid Slicer/Shredder Attachment
Watch for that little notch.
- Summer cole slaw – This recipe, from Kitchenaid’s New Zealand page is not your usual cole slaw; it has green beans, sultanas (golden raisins) and hazelnuts.
- Conventional cole slaw – If you prefer the standard version, try this recipe. I do think I’d cut the mayo a bit and replace some of it with sour cream or Greek yogurt.
- Mushroom Onion Quiche – With a pre-made crust, this is a quick and easy meal. I would buy two crusts, make two and pop one in the freezer.
- Zucchini Bread – This recipe is very similar to the one that came with my Kitchenaid mixer. Use the slicer/shredder instead of a food processor (only one bowl and appliance to clean instead of two).
You can also grate cheese, make veggie chips (it’s a giant mandoline!) or shred potatoes for hash browns. Or, you could turn those sliced cucumbers into butter pickles.
Recipes Direct From Kitchen Aid
Lots of recipes here, including salsa (attach the grinder), apple crumb coffee cake, borscht (use the shredder), and pizza dough (second page).
More Ways to Use Your Kitchenaid Mixer Attachments
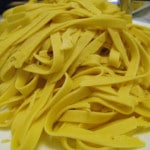
Image thanks to Mack Male via Flickr cc 2.0 sa Kitchenaid Pasta Recipes
Fresh pasta is softer and more tender than dried, and it takes a lot less time to cook too. It’s especially good for lighter sauces made with cream or butter. So alfredo yes, but bolognese no.
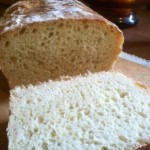 Kitchenaid Bread Recipes
The smell of fresh bread is the best! And you don’t even need any special equipment to make it either. Just the tools that came with your mixer. Make baguettes, whole wheat, potato, honey oat, or whatever you like. Recipes, instructions, and more at the link.

image thanks to JessicaFM Commercial ice cream tends to have extra fillers and thickeners (to keep the costs down). Make your own and you don’t have to worry about any of that. And you can make the exact flavor you want (oreo, rum raisin, or even double ginger).
how do you put the applesauce attachment together?
Hi Donna,
There’s a video on the page that shows you how. I just added a heading so you can find it more easily. She does run through the process a bit quickly though. This video from Kitchenaid goes more slowly, but the volume is poor. Basically you slide the small spring/shaft into the body of the grinder attachment. Then you slide the “worm” (the larger auger with spirals on it), over the spring. Put the strainer cone over that and make sure the tabs on the cone match up with the notches on the body of the grinder. Then slide the ring over all of that and tighten it. Then attach that to the front of your KitchenAid. Once it’s connected, slide the strainer tray on the end and put the splash guard on top. Hope that helps!
My attachments for shredders will NOT fit into the mixer. The little mad Peter piece that attaches to shredder then into the mixer. Any suggestions?
Hi Joan,
I’m not sure what you mean by mad Peter piece (maybe an autocorrect attack), but this is how it should work:
First, you loosen the black knob on the right of the mixer, and pop off the cover on the front. Then slide the shredder attachment inside and tighten the knob. Put the blade you want inside the shredder mechanism until it clicks. Every attachment should fit every mixer.
Here’s a little video I found that may help: https://www.youtube.com/watch?v=dRqcM3mKMSU
Thank you! It’s been several years since I’ve used my attachments, and the instructions are AWOL. Your page has been very useful in refreshing my memory, and several of your recipes look interesting as well.
You’re welcome!